

Video Production 101: Lighting Tips

Beginning earlier this month, we started to shift our focus on the blog to video production. Part of the services we provide to our clients is the creation of graphics and videos, typically for use on social media. There are a lot of topics we could cover with video production, but we decided to highlight two key areas, the first of which is lighting. On our last blog, we discussed the different reasons why lighting is important to the filming process, and today we want to focus on tips for improving your lighting while filming. So, here are just a few tips that we recommend.
1) Utilize natural light
If you can utilize natural light whenever you’re shooting your content, then do it. It’s also nice to not have to carry around any kind of lighting rig, and it is possible to light a subject well without all the additional equipment.
2) Use a 3-Point Lighting Setup
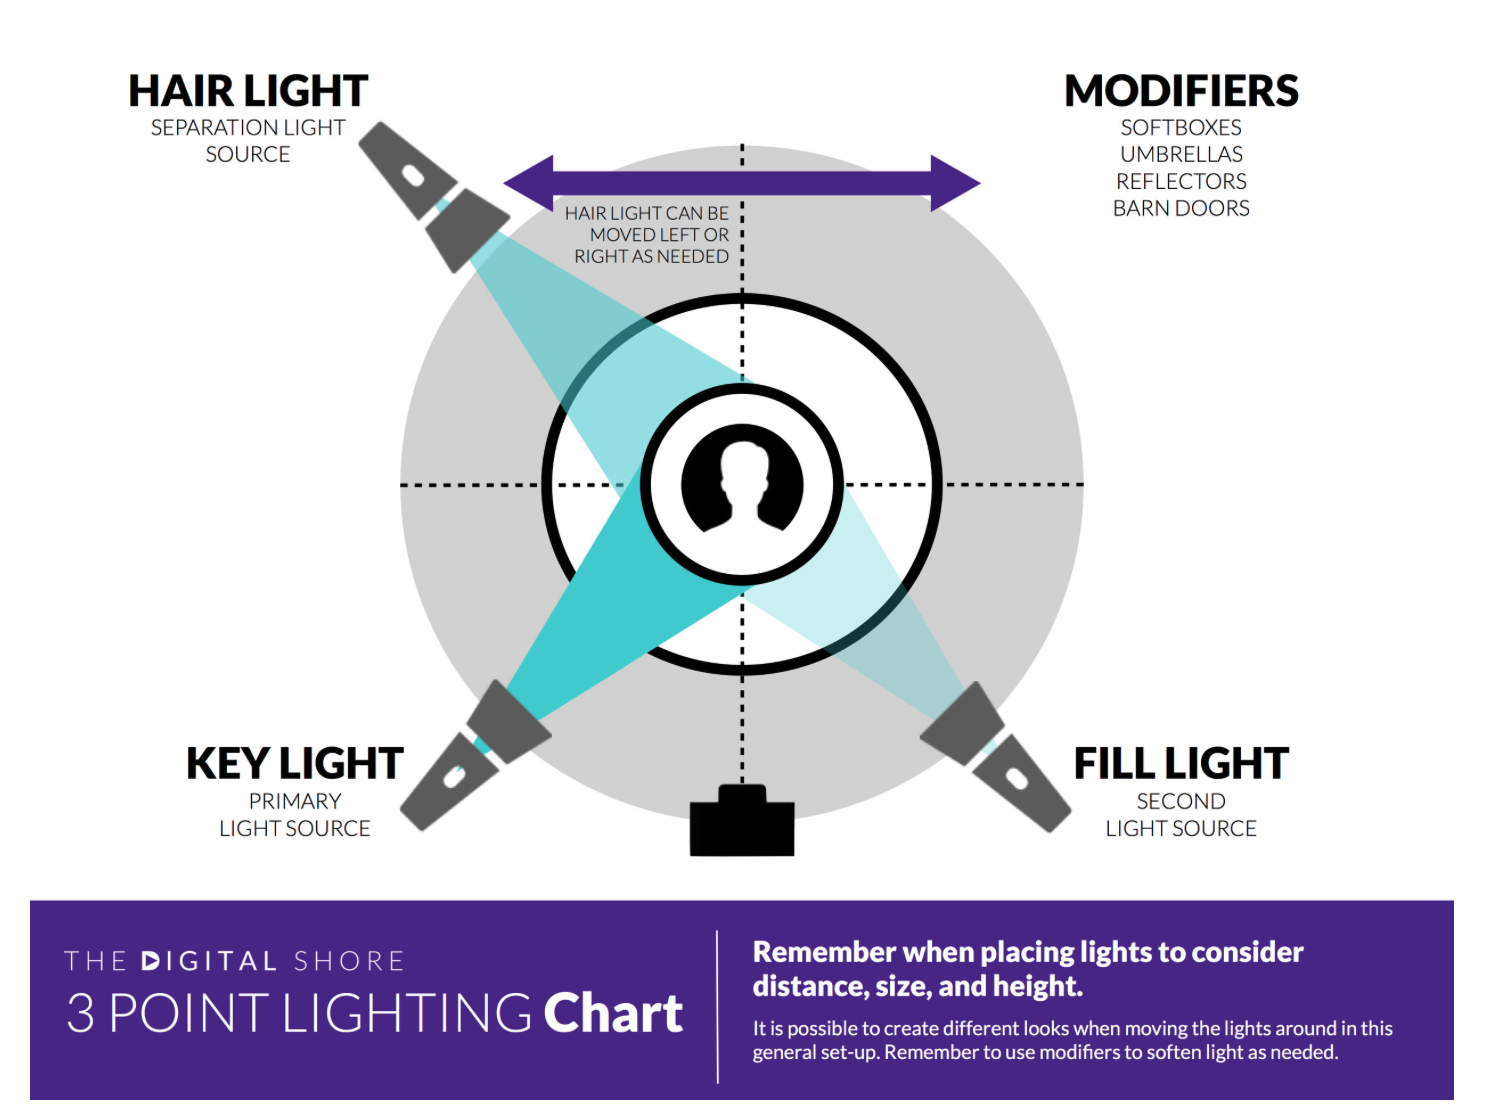
While being able to use natural light is a convenience, sometimes it’s just not possible. Whenever it’s not possible, we recommend the tried and true 3-point lighting setup. As implied in the name, it does require three different lights: a key light, a fill light, and a backlight (or hair light).
We attached a visual, but another way to think about the setup is by placing your subject in the center of a clock. If your camera is placed at 6, then your key light would be around 8, the fill light would be around 4, and the backlight would be between either 10 and 11 OR 1 and 2.
Also, for the record, all of these lights play a role in a well-lit shot. A key light is your main source of light and primarily illuminates your subject. It’s going to give exposure and provide some depth and dimension. The fill light fills in any shadows created by the key light; you can achieve a fill light effect by using a lower-intensity second light or by utilizing a reflector. Lastly, your backlight/hair light is placed behind your subject as the name suggests and helps with creating a sense of depth and separation.
3) Always do a test shot
No matter what setup you end up utilizing, the important thing is to always do a test shot. This helps you to see just how the lighting is hitting your subject and allows you a chance to adjust the lighting before actually recording anything. It saves you time in the long run and keeps you from having to reshoot as much.
4) Experiment with different angles and intensities
While the 3-point lighting setup is a common and useful approach to lighting, it’s not the only one out there. You could use just one camera at a 45 degree angle from the subject with a light on the opposite 45 degree angle. You can use a diffuser attachment to soften lights and reduce harsh shadows. There is no one-size-fits-all approach. Don’t hesitate to adjust angles or even the intensity of the lights themselves to fit your purposes.
5) Don’t forget about ISO
We realize that it’s not always possible to carry around a whole lighting setup. So, if you’re shooting in low-lit areas, remember that you can adjust the ISO setting on your camera to allow for more light to be captured.
At the end of the day, lighting is a tool at your disposal, and we hope these tips help you use it more effectively. In our next blog post, we’ll be talking about audio, so stay tuned.